Tutorial: Build a Basic Token-Gated App with SSX, RainbowKit, and Alchemy
This example will show developers how to build and enable token-gated access in their dapp with SSX based on holding an ENS name. Additionally, it will show a developer how to also use SSX with RainbowKit and Alchemy.
SSX provides developers with the easiest way to integrate Sign-In with Ethereum, enable DAO logins, resolve ENS names, and more. As we continue working on SSX, we want to show developers how they can quickly get started with easy-to-run example projects. Gating access to content based on a user's NFTs or tokens is a core-building block for building rich dapp experiences. For example:
- If a DAO wanted to limit content based on users with a certain amount of token-based voting power.
- If an NFT PFP project wanted to offer exclusive content to token holders.
- If a project wanted to enable early access to an application based on holding an NFT.
The following example will show developers how to build and enable token-gated access in their dapp with SSX based on holding an ENS name. Additionally, it will show a developer how to also use SSX with RainbowKit and Alchemy.
You can also follow along in our documentation here.
Run our Completed Example
Want to jump in and see a token-gated example in action quickly? Use the following commands to download the SSX repository:
git clone https://github.com/spruceid/ssx
cd ssx
- Ensure SSX packages are installed from the
ssxdirectory by runningyarn install - Navigate to the example directory (
cd examples/ssx-test-token-gated) - Add an Alchemy API key to
.env - In your terminal, run:
yarn install
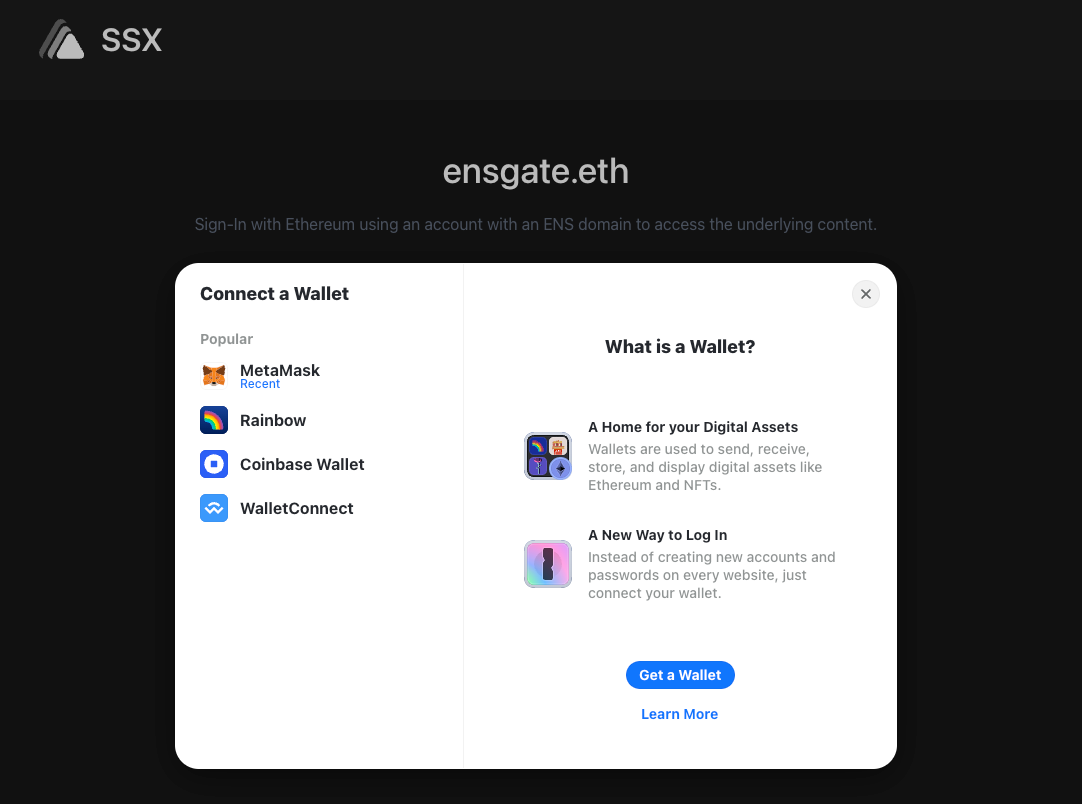
yarn startOnce run, you will be presented with a dapp using RainbowKit that prompts you to connect your wallet and Sign-In with Ethereum.
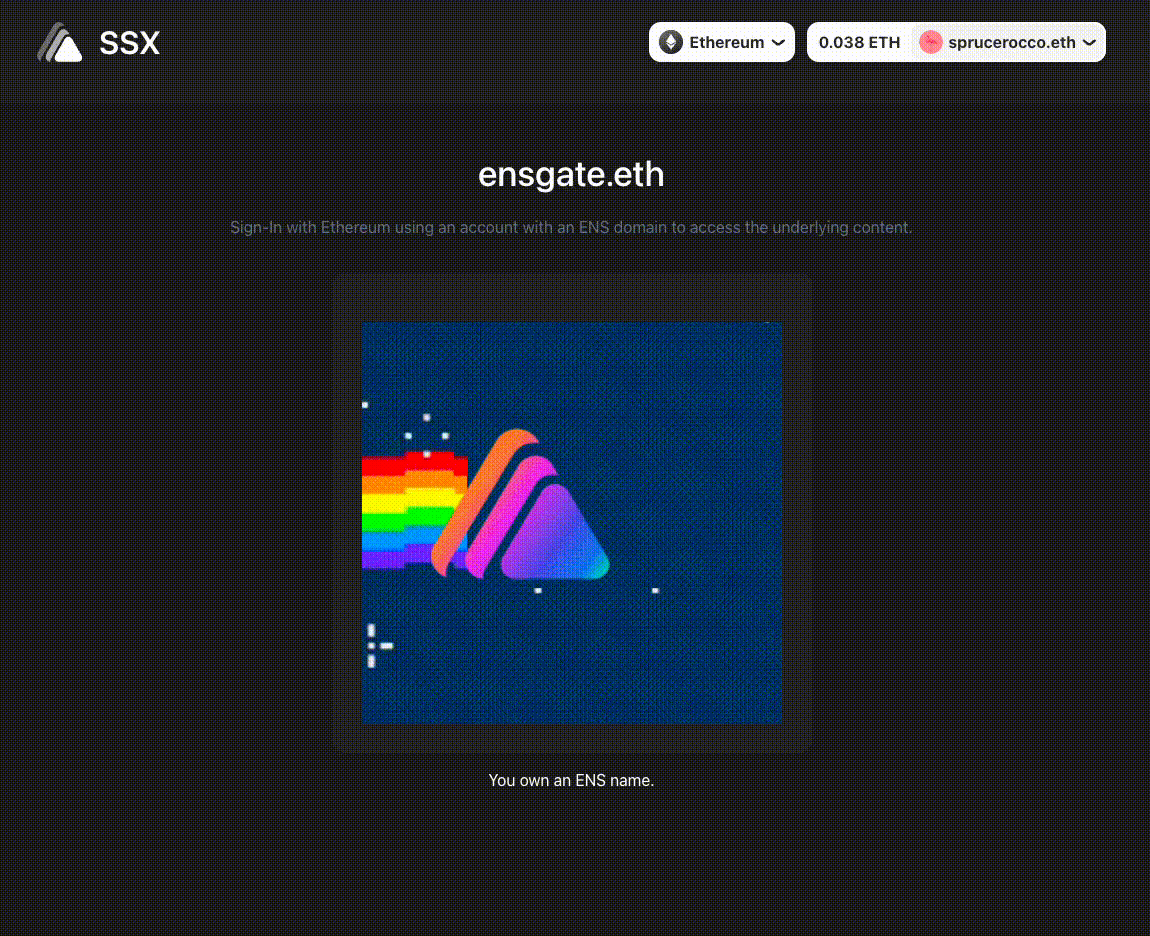
After signing in, if the wallet used owns an ENS name, you will be presented with the gated content. If not, the dapp should display "No ENS name found"
The following guide will teach you how to create a token-gated dapp enabled by SSX from our create-ssx-dapp package.
Create the Dapp Yourself
The initial setup will be done using SSX's dapp creation tool. Type the following in your terminal to get started:
yarn create @spruceid/ssx-dapp token-gated-exampleFor this example, we will be using the following explicit options in the setup tool:
- Typescript
- Leave the other options empty when prompted

create-ssx-dapp toolSet up the Alchemy SDK and RainbowKit
The Alchemy SDK dependency can be installed with the following command in the directory of your dapp:
yarn add alchemy-sdkRainbowKit is also used in this example. Add the required dependency via the following command:
yarn add @rainbow-me/rainbowkit wagmiAdditionally, you will also need to add the ssx-react dependency. To add it, use this command:
yarn add @spruceid/ssx-reactHead to src/index.tsx and add the following to plug things in initially:
/** src/index.tsx **/

import { RainbowKitProvider, getDefaultWallets } from '@rainbow-me/rainbowkit';
import {
  goerli,
  mainnet,
  configureChains,
  createClient,
  WagmiConfig,
} from 'wagmi';
import { alchemyProvider } from 'wagmi/providers/alchemy';
import { publicProvider } from 'wagmi/providers/public';
import { SSXProvider } from '@spruceid/ssx-react';

const { chains, provider } = configureChains(
  [mainnet, goerli],
  [
    alchemyProvider({
      // This is Alchemy's default API key.
      // You can get your own at https://dashboard.alchemyapi.io
      apiKey: `${process.env.REACT_APP_ALCHEMY_API_KEY}`,
    }),
    publicProvider(),
  ]
);

const { connectors } = getDefaultWallets({
  appName: 'SSX ENS Token Gated Example',
  chains,
});

const wagmiClient = createClient({
  autoConnect: true,
  connectors,
  provider,
});
Wrap your <App /> component with <WagmiConfig />, <RainbowKitProvider/> and <SSXProvider/> components, making it look like the following:
/* src/index.tsx */

root.render(
  <React.StrictMode>
    <WagmiConfig client={wagmiClient}>
      <RainbowKitProvider chains={chains}>
        <SSXProvider>
          <App />
        </SSXProvider>
      </RainbowKitProvider>
    </WagmiConfig>
  </React.StrictMode>
);
At src/App.tsx some changes are required to hook SSX and RainbowKit together.
Add the following imports and update the App component as the code below:
/* src/App.tsx */

/* Add useEffect to the existing useState bracket */
import { useEffect, useState } from 'react';
import '@rainbow-me/rainbowkit/styles.css';
import {
  useConnectModal,
  useAccountModal,
  ConnectButton,
} from '@rainbow-me/rainbowkit';
import { useSSX } from '@spruceid/ssx-react';
import { SSXClientSession } from '@spruceid/ssx';
import { useSigner } from 'wagmi';

/*....*/

function App() {
  /* SSX hook */
  const { ssx } = useSSX();
  /* RainbowKit ConnectModal hook */
  const { openConnectModal } = useConnectModal();
  /* RainbowKit Account modal hook */
  const { openAccountModal } = useAccountModal();
  /* Some control variables */
  const [session, setSession] = useState<SSXClientSession>();
  const [loading, setLoading] = useState<boolean>(false);
  const { data: provider } = useSigner();

  useEffect(() => {
    if (ssx && loading) {
      /* Sign-in with SSX whenever the button is pressed */
      ssx
        .signIn()
        .then(session => {
          console.log(session);
          setSession(session);
          setLoading(false);
        })
        .catch(err => {
          console.error(err);
          setSession(undefined);
          setLoading(false);
        });
    }
  }, [ssx, loading]);

  useEffect(() => {
    if (!provider) {
      setSession(undefined);
      setLoading(false);
    } else {
      setLoading(true);
    }
  }, [provider]);

  const handleClick = () => {
    /* Opens the RainbowKit modal if in the correct state */
    if (openConnectModal) {
      openConnectModal();
    }
    /* Triggers the Sign-in hook */
    setLoading(true);
  };

  return (
    <div className="App">
      <div className="App-header">
        <img src={logo} className="App-logo" alt="logo" />
        <span>SSX</span>
        {openAccountModal && provider ? <ConnectButton /> : <></>}
      </div>
      <div className="App-title">
        <h1>SSX Example Dapp</h1>
        <h2>Connect and sign in with your Ethereum account</h2>
      </div>
      <div className="App-content">
        {!openConnectModal && provider ? (
          <>
            <AccountInfo address={`${session?.address}`} />
          </>
        ) : (
          <button onClick={handleClick}>SIGN-IN WITH ETHEREUM</button>
        )}
      </div>
    </div>
  );
}
Finally, replace your CSS in src/App.css with the following:
/* src/App.css */
.App {
  text-align: center;
  display: flex;
  flex-direction: column;
  align-items: center;
  color: white;
  height: 100vh;
}

.App-content button {
  border: none;
  width: 100%;
  padding: 16px 24px;
  color: white;
  background: linear-gradient(107.8deg, #4c49e4 11.23%, #26c2f3 78.25%);
  border-radius: 12px;
  cursor: pointer;
  font-weight: 500;
  font-size: 16px;
  transition: all 150ms ease 0s;
  margin: 16px 0px;
}

.App button:disabled {
  pointer-events: none;
  opacity: 0.7;
}

.App button:hover {
  transform: scale(1.01);
}

.App-header {
  width: calc(100% - 128px);
  text-align: left;
  padding: 16px 64px;
  display: flex;
  align-items: center;
  background-color: #212121;
}

.App-header span {
  font-weight: 600;
  font-size: 32px;
  margin-right: auto;
}

.App-title {
  margin-top: auto;
}

.App-title h2 {
  font-weight: 400;
  font-size: 16px;
  color: #667080;
}

.App-logo {
  height: 40px;
  pointer-events: none;
  margin-right: 16px;
}

.App-content {
  margin-bottom: auto;
  width: 450px;
  max-width: 100%;
  background-color: rgba(39, 39, 39, 0.7);
  backdrop-filter: blur(2px);
  border-radius: 12px;
  padding: 30px;
}

.App-content h1 {
  font-size: 32px;
  line-height: 48px;
}

.App-account-info {
  margin-top: 16px;
  padding: 16px 8px;
  border: 1px solid #555555;
  border-radius: 12px;
  text-align: left;
}

.App-account-info b {
  color: #667080;
}
The dapp has now been configured in a very basic state and will let you simply sign in using RainbowKit.
Adding Token Gating
To token gate, we need to add some additional code and configuration.
First, let's configure the alchemy-sdk. Add the following to src/App.tsx:
/* src/App.tsx */
import { Network, Alchemy } from 'alchemy-sdk';
/**....**/

const alchemyConfig = {
  /* This is the same you used previously for RainbowKit */
  apiKey: process.env.REACT_APP_ALCHEMY_API_KEY,
  /* Change this to the appropriate network for your usecase */
  network: Network.ETH_MAINNET,
};

const alchemy = new Alchemy(alchemyConfig);
/**....**/
With the SDK configured, we now need to add the logic to verify if the signed-in address owns a token. In this case, we'll be gating based on an ENS name.
To accomplish this, tokens owned by the address must be fetched and filtered for ENS names. ENS names are under the contract 0x57f1887a8bf19b14fc0df6fd9b2acc9af147ea85, so a variable with that value needs to be added.
Add the following after the import statements:
/* src/App.tsx */
const ENS_CONTRACT = '0x57f1887a8bf19b14fc0df6fd9b2acc9af147ea85';
Including the modifications above to src/App.tsx, we can now add the additional logic needed to fetch tokens:
/*....*/

import { Network, Alchemy } from "alchemy-sdk";

const alchemyConfig = {
  /* This is the same you used previously for RainbowKit */
  apiKey: process.env.REACT_APP_ALCHEMY_API_KEY,
  /* Change this to the appropriate network for your usecase */
  network: Network.ETH_MAINNET,
};

const alchemy = new Alchemy(alchemyConfig);

const ENS_CONTRACT = '0x57f1887a8bf19b14fc0df6fd9b2acc9af147ea85';

/*....*/

function App() {
  /* SSX hook */
  const { ssx } = useSSX();
  /* RainbowKit ConnectModal hook */
  const { openConnectModal } = useConnectModal();
  /* RainbowKit Account modal hook */
  const { openAccountModal } = useAccountModal();
  /* Some control variables */
  const [session, setSession] = useState<SSXClientSession>();
  const [loading, setLoading] = useState<boolean>(false);
  const { data: provider } = useSigner();
  const [ownEnsName, setOwnEnsName] = useState(false);

  useEffect(() => {
    if (ssx && loading) {
      /* Sign-in with SSX whenever the button is pressed */
      ssx.signIn()
         .then((session) => {
          console.log(session);
          alchemy.nft.getNftsForOwner(`${ssx.address()}`)
            .then((nfts) => {
              const ownENS = nfts.ownedNfts
                .filter(({ contract }) => contract.address === ENS_CONTRACT)?.length > 0;
              setOwnEnsName(ownENS);
              setSession(session);
              setLoading(false);
            });
        })
        .catch((err) => {
          console.error(err);
          setOwnEnsName(false);
          setSession(session);
          setLoading(false);
        });
    }
  }, [ssx, loading]);

  useEffect(() => {
    if (!provider) {
      setSession(undefined);
      setLoading(false);
    } else {
      setLoading(true);
    }
  }, [provider]);

  const handleClick = () => {
    /* Opens the RainbowKit modal if in the correct state */
    if (openConnectModal) {
      openConnectModal();
    }
    /* Triggers the Sign-in hook */
    setLoading(true);
  }

  return (
    <div className="App">
      <div className="App-header">
        <img src={logo} className="App-logo" alt="logo" />
        <span>SSX</span>
        {openAccountModal && ownEnsName && provider ? <ConnectButton /> : <></>}
      </div>
      <div className="App-title">
        <h1>SSX Example Dapp</h1>
        <h2>Connect and sign-in with your Ethereum account</h2>
      </div>
      <div className="App-content">
        {!openConnectModal && ownEnsName && provider ? (
          <>
            <AccountInfo address={`${session?.address}`} />
            <br></br>
            <>You own an ENS name.</>
          </>
        ) : (
          <>
            <button onClick={handleClick}>SIGN-IN WITH ETHEREUM</button>
            <br></br>
              {!openConnectModal && !ownEnsName && provider && !loading ? (
                <>
                  <AccountInfo address={`${session?.address}`} />
                  <br></br>
                  No ENS name found.
                </>
              ) : (
                <></>
              )}
          </>
        )}
      </div>
    </div>
  );
}

export default App;
Now you can gate any content with ENS names just by checking this ownEnsName variable.
What's Next?
Gating access to content isn't only limited to tokens. You can even gate access based on different forms of on-chain activity like:
- The number of trades a user has made on Uniswap.
- How much lending activity a user has on Aave.
- The number of times a user voted on-chain in a DAO's governance process.
It doesn't stop there - this can even be extended to gating based on off-chain credentials, and more! We'll continue highlighting these examples and show how much is possible by using SSX.
Happy building!
Spruce lets users control their data across the web. Spruce provides an ecosystem of open-source tools and products for developers that let users collect their data in one place they control, and show their cards however they want.
If you're curious about integrating Spruce's technology into your project, come chat with us in our Discord.